
The easiest way to fix a leaky hose bib
Your hose bib, or spigot, is an outdoor faucet that connects directly to your home’s plumbing system. A functioning hose bib is important if you like doing things like gardening or watering your grass. One of the most common problems with hose bibs is leaking.
A leaky hose bib isn’t just wasteful — it can also get really expensive if you don’t deal with it quickly. Over time, even small water leaks can cause your water bill to increase and may even damage your home’s foundation. Not to mention, a leaky outdoor faucet provides the perfect environment for mold growth.
Luckily, hose bib repair is fairly simple. Fixing a leaky outdoor faucet can be a manageable DIY project. In this article, we’ll tell you how to identify a leaky hose bib and show you the simplest way to fix one on your own.
What causes a hose bib to leak?
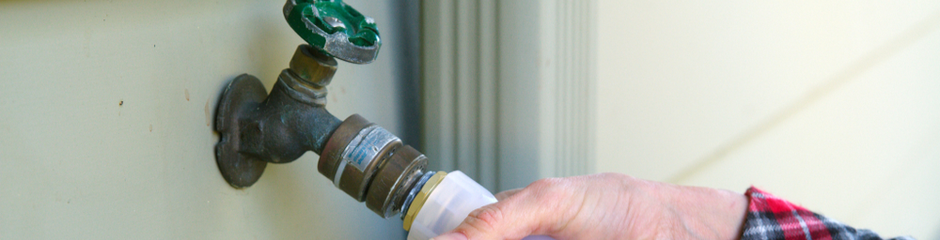
There are three main reasons your hose bib might be leaking. The first is a loose packing nut. The packing nut is located right underneath the handle on your spigot. Its job is to make a seal around the spigot’s valve stem so water can’t get through. Some faucets also have a packing washer below the nut to fortify the seal.
You’ll know you have a loose packing nut if water spews out from under the faucet handle only when the hose bib is turned on. If you have this problem, all you have to do is take a pair of pliers and tighten the packing nut by turning it counterclockwise. As the seal tightens, you should see the spigot stop leaking.
Another common issue that causes leakage is frost damage. Frozen-water damage can cause huge plumbing problems, like broken spigots and ruptured pipes. The best way to handle frost damage is to try to prevent it. If you live somewhere cold, it might be a good idea to invest in a frost-proof faucet.
A frost-proof outdoor faucet has a long tube that connects the spigot to its water-supply source. This means that the water source can be farther inside your home, making it less vulnerable to freezing. In a normal outdoor spigot, the water-supply source is right against the wall where it’s exposed to the elements.
The third reason your outdoor faucet might be leaking is there’s a malfunctioning element within the faucet body. Usually, the culprit is a worn-out washer. When your outdoor hose bib is turned on, water rushes over the washer and can cause it to warp over time. If water leaks or drips out of your spout when the spigot is turned off, this is likely the issue. Read on to see what to do if this happens.
How to fix a leaky hose bib
Most indoor faucets use cartridges with openings that let water flow. When you twist one handle, an opening in the cartridge allows hot water to come out. When you twist the other handle, an opening allows cold water to come out.
Outdoor faucets rely on an older compression system. When you turn the handle to shut off your garden hose bib, a threaded stem pushes a rubber washer down to restrict water flow. When the spigot is completely shut, the washer forms a seal against the valve seat that stops water from escaping.
After a while, though, rushing water can wear down the washer and let water get through. Replacing a worn-out washer in your hose bib requires disassembling your spigot. In the next few sections, we’ll give you a step-by-step guide for taking apart your hose bib, replacing a damaged washer and fixing your spigot.
Before you start repairing your hose bib, though, you’ll need a few essential tools in your repair kit. These include:
- Screwdriver: Make sure to get the right screwdriver (Phillips or flathead) for the screw that holds the washer in place.
- Screws: If any screws are damaged in your faucet, they might need to be replaced. Make sure you have the right-size screws. Many hose bibs use quarter-inch screws.
- Channellock or tongue-and-groove pliers: You’ll need a steady grip to take apart your spigot. An adjustable wrench will also do the trick.
- Faucet washers: Make sure to get the right-size washer for your system. A common washer size for outdoor spigots is ¾-inch/20 mm.
- Graphite or Teflon packing string: You may need to replace the packing string under the packing or bonnet washer.
Turn off the water supply
The first thing you’ll want to do before you get to work is shut off your water supply. The shut-off valve for your spigot should be located inside your house. Typically, it will be next to where your spout is located, near the ceiling. Shut off the valve by turning the handle all the way to the right.
If you can’t find the shut-off valve, it’s possible your hose bib might not have one. In that case, you should shut off the water supply to your whole home. Your main shut-off valve might be in a basement or near a crawl space. After shutting off the water supply, open your spigot for a short amount of time to allow any built-up water pressure to dissipate.
Remove the handle
Secure your Channellock or tongue-and-groove pliers around the packing nut of the spigot. Twist counterclockwise to remove the faucet handle from the rest of the faucet. The packing nut can also be referred to as the bonnet nut. There may also be a screw that holds the handle in place. Don’t be afraid to jiggle the handle a bit until it comes off.
Unscrew the packing nut and valve stem
After you remove the handle, you’ll see a screw that attaches the washer to the threaded stem. Unscrew it and detach the washer from the stem. You’ll likely find that the washer is either warped or broken, causing wasted water.
Replace the stem washer and packing string
After taking out the old washer, stick the new washer in the washer groove on the threaded stem. The right-size washer will fit snugly into the groove. Secure the new washer using the screw that you previously removed. If the screw is warped or stripped, you may need to use a new one.
Remove the old packing string from under the bonnet nut. Tie a handful of layers of new string in its place. Make sure to wrap clockwise. You can use a packing washer instead if your faucet model uses one.
Reassemble and test the faucet
Now it’s time to put your outdoor faucet back together. Twist your stem back into the faucet. Secure the bonnet nut with your pliers. Reattach the handle if it’s a separate piece from the bonnet. Make sure the handle is secure but not too tight. It should be fairly easy to turn on the spigot.
Turn the water to the spout or your home back on and open your faucet. If you see any leaks from around the packing nut, tighten it with your pliers until it stops leaking. Turn off your faucet and wait a few minutes to make sure it stops dripping. If it doesn’t, you might have to reopen it or call a professional plumber to see what’s wrong.
Protect your home plumbing system from expensive repairs with Cinch
While fixing a leaky hose bib is relatively easy, continually having issues with leaking water might be a sign of a bigger problem. Fortunately, with a Repair Plus Replace plan from Cinch Home Services, you’ll be able to rest easy knowing many important systems in your home, like the plumbing, are protected.
Get a free quote and see how a Cinch home protection plan can help you protect your budget and still get the coverage you need for all of your important systems.


