How to insulate your hot water pipes for winter
Your guide to the ABCs of DIY hot water pipe insulation
Hot water pipe insulation – key tips to remember:
- Pipe insulation is inexpensive and effective
- DIY pipe insulation is easier than you think
- Don’t forget to insulate your cold water pipes
- Insulated pipes increase your home’s efficiency
- A more efficient home costs less to operate
If you’re like us, you’re into getting a jump on fall maintenance. Before you even start to feel the nip of cold in the air, you might start thinking about hot water pipe insulation. It’s not the most glamorous thought, but hey, it’s never too early to start planning for cold weather. Insulating hot water pipes can add to your home’s efficiency, save money, and keep you comfortable when the chill is on. If you’re wondering about DIY pipe insulation and whether you’ve got it in you, the good news is that you probably do, and it’s no big deal. We’re here to help explain what you need to know, so before you start hiring plumbers or searching online for weird stuff like “best how water pipe insulation,” read on, and we’ll get this done together!
Increasing efficiency while decreasing bills
One major benefit of hot water pipe insulation is increased efficiency and decreased utility bills. Insulated pipes lose less heat. Water heaters don’t work as hard to maintain water temperature when pipes stay warmer for longer. In turn, that water heater requires less fuel, so your home consumes less energy, and voila! Your utility bill drops. It’s not rocket science, but many people fail to realize how small, inexpensive efforts like DIY pipe insulation can make a real difference in your wallet. Insulated pipes also mean it won’t take as long for your water to heat up, and you’ll be able to set your water temperature a few degrees lower. Consider insulating your cold water pipes as well to prevent frozen pipes, condensation, and the resulting mold and mildew. You’ll also keep the water cold when that’s what you expect.
Water conservation
In addition to the significant benefits to your home in terms of increasing efficiency while decreasing utility bills, you’ll also benefit from water conservation. When your pipes are sufficiently insulated, you get more of what you want (hot or cold water) faster, so you use less of both. Without insulation, hot water cools quickly in the pipes, so it takes longer to heat up, leaving you to run it and wait for it to hit the right temperature. It’s always a good idea to conserve water, not only because you’ll spend less money over time, but also because it’s an essential resource worth saving, no matter where you live.
Significant supplies
If you’re determined to DIY your water heater pipe insulation, you’ll need a few tools and supplies. Hopefully, they’re primarily items you already have at home, but you might need to make a trip to your local hardware store. Read this whole article before shopping because you’ll want to measure before buying insulation. Items you need include the following:
- Long sleeves and pants
- Gloves and a towel
- Eye protection
- Headlamp
- Utility knife or scissors
- Tape measure
- Magic marker
- Pipe insulation
- Pipe insulation tape and zip ties
Prep steps
Once you’ve gathered your supplies, preparing for DIY hot water line insulation consists of a few steps. First, refer to your water heater owner’s manual to make sure you know how much space it recommends to allow between the unit and the vent. Most recommend a good 8 inches of clearance using ¾-inch polyethylene or neoprene foam. If you must get closer than 8 inches, be sure to use 1-inch-thick fiberglass-based pipe wrap with no facing. The last thing you want is to burn the insulation. A pipe is measured by its internal diameter, so keep that in mind as you measure for width and length to see how much insulation you’ll need.
DIY pipe insulation steps
If you’re building a new home or installing new pipes, it’s a no-brainer to go ahead and insulate the new pipes along the way. If you’re insulating existing pipes, it’s still a relatively easy job that should only take a few hours at most. Here’s a detailed explanation of the step-by-step process so you’ll know everything before getting your hands dirty:
1. Measuring: Before buying any pipe-wrap insulation tubes, take careful measurements of all the pipes you plan to insulate. Make a note of the size of the insulation (based on the interior pipe diameter) and the length you’ll need for each pipe. You’ll also end up cutting pieces to fit along the way. Start by measuring the pipe diameter, usually between 3/8 and 1 inch, which should allow your insulation to wrap snugly around the pipe. Your next measurement is the length of each pipe you plan to insulate, beginning at the water heater. Measure each section twice and write down everything using your magic marker.
2. Purchasing: With precise measurements in hand, you’re ready to head to your local hardware store, home improvement center or online retailer to purchase your pipe insulation. Choose non-flammable insulation, especially if you have a gas water heater. For shorter pipe sections closer to the heater, you may want to consider fiberglass for a little extra protection, but wear your protective gear. Otherwise, neoprene and polyethylene foam are the most popular and inexpensive insulation choices for your pipes. Additional options include a coil/wraparound style or tubes with Velcro closures; otherwise, you’ll need tape, ties or wire to secure the insulation in place.
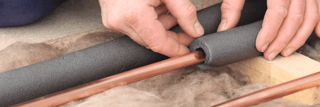
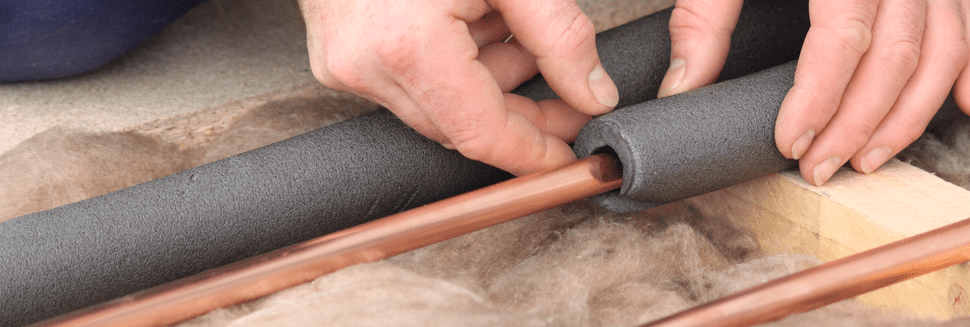
3. Cutting: Before you cut anything, inspect all the pipes you plan to insulate. You’ll want to make sure each one is clean and dry. If that’s not the case, take the towel and wipe them down. Of course, you’ve already measured at least twice, but if you want to be sure not to waste any materials, go ahead and measure one last time, making sure your new measurements match your old ones. Then you’ll be ready to cut each section of pipe insulation to fit each pipe. Try to make your cuts at a clean, right angle.
4. Installing: Once all your cuts are complete, you’re ready to begin installing each section of pipe insulation. If you’re using foam or fiberglass, you can install each section seam side down. As you install each piece, add tape, wire or a plastic fastener like a zip tie to hold sections in place every few feet along the length of each pipe.
Finishing up
While you’re at it, you might as well get a little more inexpensive pipe insulation and wrap your outdoor water pipes, such as any hose valves and faucets exposed to the elements. You can even purchase insulated drawstring hoods to cover the entire outdoor faucet assembly during the coldest months to keep them from freezing. Hopefully, our DIY pipe insulation post has been helpful! While you’re here, check out a few more of our home winterization tips.
The information in this article is intended to provide guidance on the proper maintenance and care of systems and appliances in the home. Not all of the topics mentioned are covered by our home warranty or maintenance plans. Please review your home warranty contract carefully to understand your coverage.


